February 28, 2009

DB Flourless Chocolate Cake and Ice Cream (original and raw)

It's Daring Baker Time!

The February 2009 challenge is hosted by Wendy of WMPE's blog and Dharm of Dad ~ Baker & Chef.
We have chosen a Chocolate Valentino cake by Chef Wan; a Vanilla Ice Cream recipe from Dharm and a Vanilla Ice Cream recipe from Wendy as the challenge.


My brain was elsewhere this month and I ended up leaving this challenge until the very last minute. This month our hosts gave us the task of making a flourless chocolate cake and ice cream to go with it. For the cake we were given the recipe for Chocolate Valentino from Sweet Treats by Chef Wan, Malaysia’s “most flamboyant food ambassador". I've made similar flourless chocolate cakes before so I decided to make a small batch of the required recipe and try a new raw cake recipe as well. If you haven't tried one before, raw cakes and brownies are the perfect way to get your feet wet in raw food. It's amazing what you can do with cocoa, nuts and dried fruits. The results are delicious, very satisfying and rich in nutrients and anti-oxidants.

For my ice cream I went raw as well. I bought an ice cream maker attachment for my Kitchen Aid mixer last year and while I love the homemade sorbets I've been disappointed with the soy milk and soy creamer recipes for ice cream I've tried. However the raw ice cream recipes have been fantastic. For the challenge I went with a bookmarked recipe for Raw Chocolate Avocado Mousse Ice Cream. This recipe doesn't require an ice cream maker but I thinned the base a little with water and used mine anyway. I also added a good pinch of salt, because chocolate and avocado both need salt to bring out their flavors. I also added some not raw mini chocolate chips and a tablespoon more agave, to make it more appealing to my son.

I also had some homemade caramel ice cream made, a work in progress which is semi raw. I paired that with the original flourless chocolate cake. This ice cream recipe is still a little too heavy but I promise to share the recipe as soon as it meets my exacting ;) standards. For the base, I'm playing with the raw Mint Chocolate Chip Ice Cream from Everyday Raw, a recipe I highly recommend.

The quality of chocolate is key in these recipes. For the flourless Valentino cake I used Scharffen Berger semisweet chocolate. For the ice cream and raw cake I didn't use raw cocoa. Raw cocoa is fine but can't match my favorite cocoa, Green and Black's Organic cocoa. You'll taste the difference in everything you make with this cocoa and it's fair trade to boot!

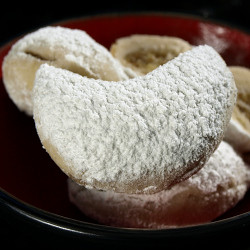
The Valentino cake was a decent flourless cake but I have to tell you that I much preferred the raw cake. It's more like a square of fudge than a cake per se but the chocolate flavor is excellent! It's just sweet enough and it was wonderful with the creamy avocado ice cream and fresh strawberries. Another Daring Baker challenge accomplished, thanks to the hosts and to the great bloggers whose recipes I used.

Mini Chocolate Valentino (the flourless chocolate cake) with caramel semi-raw ice cream Raw Chocolate Cake with Raw Chocolate Avocado Mousse Ice Cream 
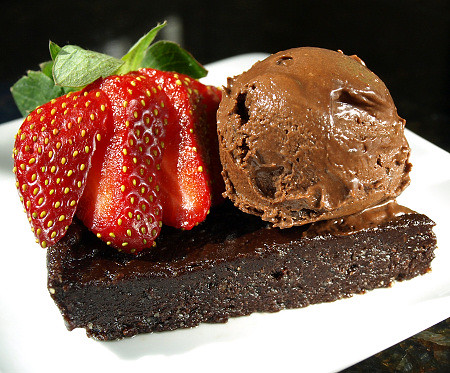
My favorite baking cocoa is Green and Black's Organic Fair Trade Cocoa
*photo swiped from G&Bs website, the pretty brown and gold container was ridiculously hard to photograph well


Recipe Links:
-The original recipes for the challenge are provided by Wendy at WMPE's Blog or Dharm at Dad - Baker and Chef. A 2/5 recipe makes a perfect dozen mini cakes in this Norpro Mini Cheesecake Pan.
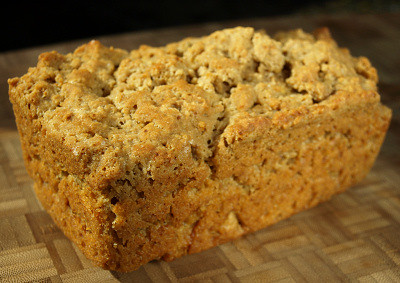
-I used Shelly's recipe for Raw Flourless Chocolate Cake, please visit her wonderful blog Musings from the Fishbowl. Her cake recipe comes from Raw Food Made Easy by Jennifer Cornbleet. I molded Shelly's cake in a 6-inch springform pan and it worked nicely.
-The recipe for Raw Chocolate Avocado Mousse Ice Cream comes from Vegan Cookbook Critic, who adapted the recipe for chocolate avocado mousse from Renee Loux's Perfect Chocolate Mousse. I recommend trying this as mousse as well, it was very good unfrozen.
-You'll have to wait for the caramel raw ice cream recipe but you can find the recipe for raw mint chocolate chip ice cream in the book Everyday Raw by Matthew Kenney. A link to the book can be found in my post Mint Chocolate Chip Ice Cream (dairy-free, raw and fantastic!)

Click below to visit the Daring Baker Blogroll and see the other chocolate creations.

February 26, 2009

Pantry Plans

Yes, the new kitchen is flashy and exciting but I'm REALLY enthusiastic about having a walk-in pantry. All that space! I can label stuff like Martha! Ok, I can't imagine I'll get that organized-- but think about how much mess I can hide in there! My cupcake papers and candy molds don't have to stored in the laundry room. The canning equipment can actually be on the main floor instead of a corner of the basement. I don't have to store my onions in a shoebox.

Today I worked out the closet layouts and it really got me fired up. It shouldn't be much more than a month til the move!!! For the layouts, I used the online design tool on the Easy Track website. They're an earth-friendly closet system that our builders suggested. The design tool was easy to use and it was fun to see the unit spinning in 3D. Their customer service staff was very helpful (I called several times with questions). Now, if only the outlets all line up perfectly I'll be set. Here's the pantry layout:


More posts about my new kitchen and some links:
Building a dream kitchen feels like...
Plans for my new kitchen
More about the house at my other blog, Building on Dog Hill
Our builders, Steinorth Fine Homes
The closet system site, Easy Track
*No compensation was received for this Easy Track plug, but a discount wouldn't be turned down. ;)

February 25, 2009

Black Bean "Tacos" with Smoked Paprika Shiitake Mushrooms

I'm overwhelmed by the response to pudding cakes. I'm so glad you liked them! This is food to balance out that indulgence.

I'm working on cleaning out my pantry so I have less to pack for our move. Six months ago I was going through a black bean kick and in my digging today I found a can that had gone astray. My mind wandered and I got to thinking about these beautiful beans from ChezWhat?. The author, Christo (aka doggybloggy), had a plan to cook his beans with wild mushrooms. Green beans and mushrooms is a dish that would be part of my Last Supper but I don't think I've ever eaten dried beans and mushrooms together. I had shiitakes in my fridge and decided to make Napa cabbage wrapped tacos filled with beans and mushrooms. I enhanced the natural smokiness of the shiitakes with some pimenton (smoked paprika) and adapted a Weight Watcher recipe for cumin-scented black beans. Some lime, cilantro and green onions topped it off, with cherry tomatoes grown in my Aerogarden on the side. This was a satisfying lunch and I loved the spices, especially the smoked paprika on the shiitakes. I could eat a whole bowl of those mushrooms! I'll be thinking of other dishes to add them to. These also got a glowing review from my husband, he said they were "surprisingly good."

Black Bean "Tacos" with Smoked Paprika Shiitake Mushrooms
Inspired by the Weight Watchers recipe for Shrimp Over Cumin-Scented Beans
Makes 2 servings (each serving is 4 WW points by my calculations)

8 ounces shiitake mushrooms
1 1/2 teaspoon neutral oil
1/4 teaspoon pimenton dulce (sweet smoked paprika)
1 chile pepper, seeded and minced (I used a Thai bird)
1 clove garlic, minced or grated with a microplane
1 (15 oz) can of whole black beans, drained and rinsed
1/2 teaspoon ground cumin
1/4 teaspoon oregano (I used Mexican)
4-6 leaves of Napa cabbage, washed and dried
a handful of cilantro, washed, dried and torn
1 green onion, cleaned and thinly sliced
1 lime, cut into wedges
kosher salt and black pepper

-Trim off and discard the shiitakes stems (or save them to use in making stock). Brush any dirt from the mushroom caps and thinly slice them.
-Add 1 teaspoon of the oil to a hot skillet or saute pan. Add the mushrooms and cook until they are golden brown. Toss them with the smoked paprika and a good pinch of kosher salt and remove them from the pan.
-Add the remaining 1/2 teaspoon of oil to the pan with the chile and garlic. Cook over low until fragrant, just a few seconds.
-Add the beans, cumin and oregano to the pan along with a good pinch of kosher salt and a couple grinds of black pepper. Warm the beans and smash a quarter of them. Taste and add more salt and pepper as desired. Remove the pan from the heat.
-Serve each leaf of cabbage with some of the beans topped with the mushrooms, cilantro, and green onion. Squeeze a wedge of lime over the "taco" before eating.

I'm adding this to Bookmarked Recipes, an event started by Ruth of Ruth's Kitchen's Experiments. Visit the new Bookmarked Recipes site for the roundup of other bookmarked and tested recipes. The host for next week’s round up will be Marci of Pieces.

*I'm also submitting this to the current BSI, Blogger Secret Ingredient, which is black beans. This is my first time participating in this event but I was inspired after seeing the winning recipe from last week, Kale Crust Pizza. Doesn't that sound awesome?! If you'd like to join in or read some interesting facts about black beans visit Just Sweet Enough.

**I was curious about how many points a pudding cup would have and for one espresso cup without foam it comes to 3 WW points.

February 23, 2009

Chocolate Espresso Pudding Cupcakes with Caramel Milk Foam

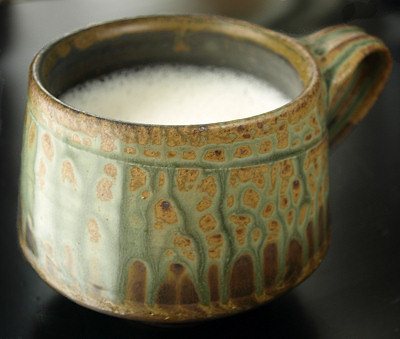
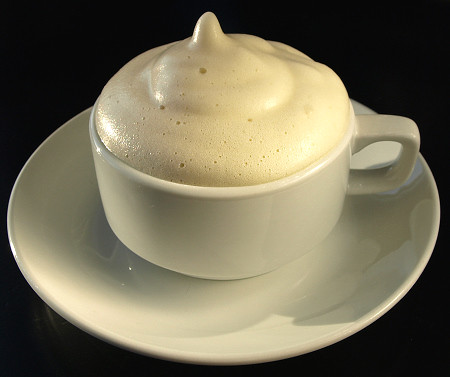
I'm down to the line with my Iron Cupcake entry this month. This month's ingredient is coffee. My idea was to make pudding cakes flavored with espresso that would be baked in espresso cups. I also wanted to play with a recent acquisition, Versawhip a soy protein powder that can whip liquids into foams. I bought the Versawhip after seeing the honey fluff made with it on Garrett's Table. I've made maple syrup fluff with it which was great on pancakes and sweet potatoes. Using it to foam soy milk is pushing the limits since there is fat in soy milk that lessens the foaming capabilities. However the consistency was what I was looking for, just like the foam of milk on a cappuccino without having to heat the milk.

The pudding cakes are really a treat and super easy to whip up. I will warn you that despite several adjustments to the recipe I couldn't keep them from bubbling over a little in the oven. You could solve that problem by baking them in one larger pan per the original recipe but then you lose the appeal of having your own little cupcake in an espresso cup. Who doesn't like to have their own little portion? These little cups are dark and chocolaty. The cake is fluffy on top and the pudding hidden underneath is thick and rich. The best part is that they don't have any undercooked egg danger and the recipe was easy to make vegan/dairy-free. I quite like the faux cappuccino look of the milk foam but I'd hate to discourage anyone from trying these because they don't want to go out and buy some crazy soy protein powder. Give them a try topped with vanilla ice cream, whipped cream or some cashew cream.

Chocolate Espresso Pudding Cupcakes
My adaption of the recipe for Chocolate Pudding Cakes from Baking Bites. Please look to the original recipe for a larger version that is baked in an 8-inch square baking pan.
Makes 4 (3 ounce) espresso cup
cupcakes
*These are the espresso cups I used.

Batter:
4 tablespoons all-purpose flour
3 tablespoons +1 teaspoon sugar
4 teaspoons cocoa powder
1/2 teaspoon baking powder
a pinch of salt
3 tablespoons milk (Silk DHA Enhanced soy for us)
1 tablespoon neutral oil
1/2 teaspoon vanilla extract

Topping:
3 tablespoons + 1 teaspoon brown sugar
4 teaspoons cocoa powder
4 teaspoons mini chocolate chips (Enjoy Life chips is my choice)
6 tablespoons boiling water + 3/4 teaspoon espresso powder or 6 tablespoons hot espresso

-Preheat your oven to 350 degrees F.
-Stir together the dry ingredients for the batter (the flour, sugar, cocoa, baking powder, and salt). Add the milk, oil and vanilla and stir until a smooth batter forms. Spoon equal amounts into 4 oven safe espresso cups or use 4 other oven safe ramekins or mugs.
-In a small bowl mix together the dry ingredients for the topping (the brown sugar, cocoa, and chocolate chips). Spoon equal amounts of this mixture over the tops of the batter filled cups. Place the cups on a baking sheet lined with aluminum foil.
-Pour over the boiling water mixed with espresso powder or hot espresso. I spooned a tablespoon over each and then repeated with the remaining hot liquid until all was distributed evenly.
-Carefully place the baking sheet with cups into the hot oven and bake for 20-25 minutes. The cakes are done when the tops are puffed and set but you should be able to tell that there is pudding settled on the bottom.
-Remove the cups from the oven and cool slightly.
-Serve warm topped with caramel milk foam, whipped cream, ice cream or eat as is. You could foam some milk using a milk frother like this one.

Caramel Milk Foam
Based on tips from Garrett of Garrett's Table. Thanks Garrett!
Makes a little over 1 cup of foam

2 grams Versawhip 600K (soy protein powder purchased from Willpowder)
40 grams of soy milk
50 grams caramel syrup (I used syrup from this recipe)

-Whisk together the Versawhip and soy milk together until soft peaks form.
-Drizzle in the caramel syrup and continue whisking until all the syrup is incorporated and the foam is light and frothy.
-Spoon over the cupcakes and serve immediately.

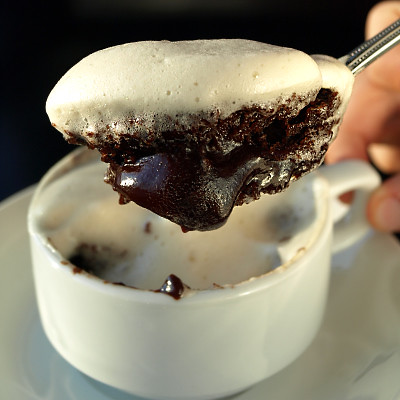
This month's voting will begin Sunday, March 1 at 8 p.m. at No One Puts Cupcake in a Corner and will be open through Friday, March 6 at 12 noon.
The February Prize Pack includes prizes from:
Diana Evans, Lots of Sprinkles and Cakespy.
Prizes also come from these corporate providers:
Head Chefs by Fiesta Products, Hello Cupcake by Karen Tack and Alan Richardson, Jessie Steele Aprons, The Cupcake Courier, and Taste of Home Books
Iron Cupcake:Earth is sponsored in part by 1-800-Flowers and Upwithcupcakes.com
As an added bonus for February, Sweet Cuppin' Cakes Bakery and Cupcakery Supply will be tossing in a variety of cupcaking supplies.

Abbie rates this recipe sniff worthy. 
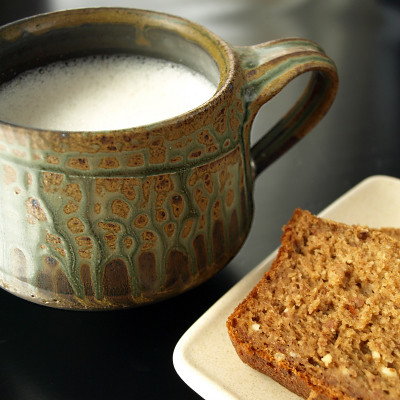
Did you notice my son Alex's fingers in the spoon shot? He thought it was hilarious to try and steal the cup while I was taking the picture.

February 18, 2009

Beer Bread Experiments and some Bean Salad

I've been baking a lot of bread lately. There have been plenty of baguettes from
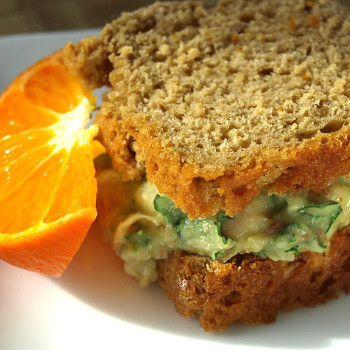
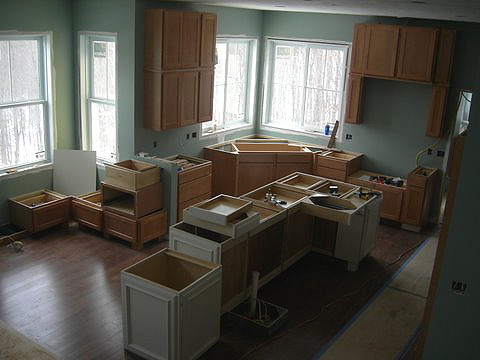
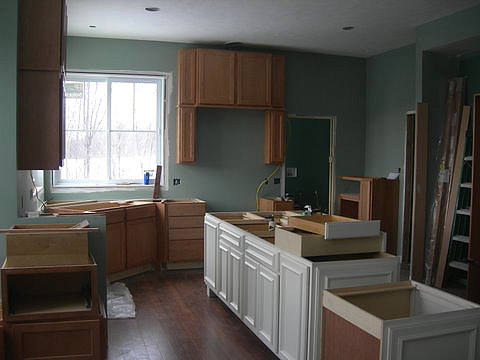
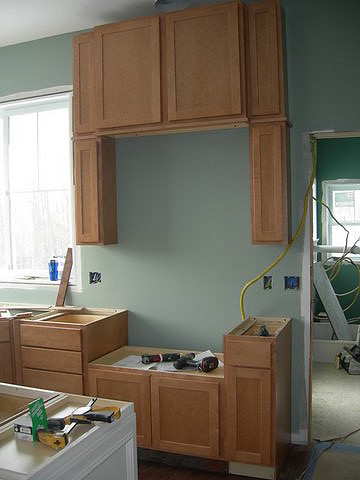
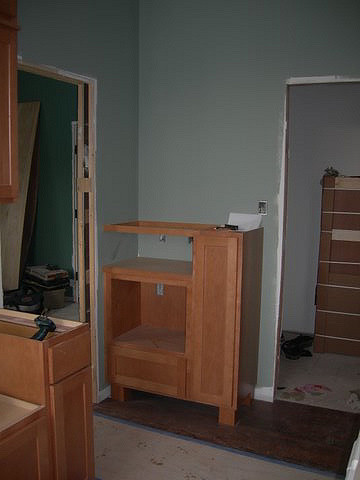
 Artisan Bread in Five Minutes a Day, countless variations on banana bread, applesauce bread with nut milk pulp and quite a bit of beer bread. I was curious about how much the quality of the beer will effect the quality of the beer bread, so I started to play around. A recipe that simply calls for 12 ounces of beer leaves a lot of interpretation to the reader. Should I just go get a Bud Lite or is it worth it to use better beer? For the sake of experimentation, my latest beer breads have been made using some microbrews my parents brought back for me from Pittsburgh and the quality and flavor of the beer does make a big difference. I was particularly inspired by the microbrew called Stoudt's Fat Dog, an Imperial Oatmeal Stout. I love the dog on the label. It looks just like my father-in-law's black lab Max, who is quite the emperor of their house. ("Imperial" stout: "emperor"--get it?) I'm usually not a huge stout fan but I enjoyed my sampling--at 8am when I was making the bread, which felt naughty but I only had a taste! It had the more meal than drink appeal of good stout and a sweet molasses flavor that seemed perfect for bread.

I've been using a beer bread recipe I found on the site Zesty Cook. I like that it uses half whole wheat flour and the brown sugar in the dough adds just enough sweetness. The best part is the melted butter (Earth Balance margarine for us) that you pour over the top of the dough before baking. It makes the best tasting crunchy crust! I make my beer loaves in mini loaf pans and that gives you even more crust to savor. The day of my Fat Dog bread experiment I also made a bean salad. Inspired by a mock tuna salad recipe from The Daily Spud, I made some changes according to what was in my kitchen. I swapped cannellini beans for chickpeas, kale for parsley, home dried tomatoes for fresh, and some mashed avocado instead of mayonnaise. Though it deviated greatly from the original intent of mimicking tuna salad, it was a delicious, nutrient dense cross between bean dip and guacamole. And it was great on the beer bread! I think it would work equally well on other hearty breads, pita or just eaten with corn chips.

Here's is a link to the Beer Bread recipe from Zesty Cook. For the Fat Dog stout bread, I replaced a half cup of the all-purpose flour with oat flour, in honor of the oatmeal that went into the stout. My flour measurements were 1 1/2 cup whole wheat, 1 cup all-purpose flour and 1/2 cup oat flour. It made the bread a little softer inside but didn't change the taste much. The real change in taste came from the beer. I plan to keep playing with other brews and maybe other beer bread recipes to see what I like best. I'd love to hear about your adventures in beer bread. What beers have you tried? Any favorite recipes for the beer bread? If you'd like to try it, here's my bastardized (but yummy) bean salad that I think is great on beer bread.

Bean Salad/Dip/Spread
Inspired by Mock Tuna Salad recipe on The Daily Spud who got the recipe idea from The Nomadic Gourmet, there is nothing like a viral recipe.
Makes ~2 cups

2 sundried tomatoes (I used home dried tomatoes from this summer)
2 large leaves of kale
1 (15 oz) can of cannellini beans (For canned beans I buy Eden Foods organic beans, they're a Michigan company)
1/4 cup diced onion
1 stalk celery, diced
juice from 1 lemon
1/2 small avocado, mashed
salt and cayenne pepper to taste

-Soak the dried tomatoes in just enough hot water to cover them for 5-10 minutes. Drain and dice.
-Wash the kale, remove and discard the stem and chop the leaves.
-Drain and rinse the beans. Place them in a bowl and mash a least half of them.
-Add the rest of the ingredients, stir and taste for seasoning. Add more salt and/or cayenne pepper to taste.
-Serve on bread or with chips.

Crunchy crusted beer bread made with Fat Dog StoutStoudt's Fat Dog Imperial Oatmeal Stout, so you can see the great label.

*I have one last site recommendation. If you are looking for a new banana bread recipe try this site. The number of different recipes seems endless and I'm addicted to watching the ingredient cloud on the side bar spin. It's like playing banana bread roulette!


I'm adding this to Bookmarked Recipes, an event started by Ruth of Ruth's Kitchen's Experiments. Visit the new Bookmarked Recipes site for the roundup of other bookmarked and tested recipes.

February 13, 2009

Strawberry Jello Heart Cookies

These cookies are an oddity and not something I would normally make, but I asked my son Alex what kind of cookies he wanted and "strawberry" popped out of his mouth. I've never had luck making anything with baked strawberries but I do have a bad habit of buying Jello even though we only eat it 2-3 times a year. So I dug around and found that yes a box of strawberry Jello was hiding in my pantry. Armed with artificial strawberry flavor and red dye #40 (hey moderation is the key, right?) I hunted down a Jello cookie recipe I'd seen online. I felt I had to redeem myself somewhat so I added a real vanilla bean and made them heart-shaped for Valentine's Day.

I think any sliceable cookie recipe would be easy to make heart shaped. All I did was roll the dough up into a tube, refrigerate it for the required 2+ hours. Then when I was ready to bake I cut a notch on one side and shaved off a little on the other side to make the pointed bottom of the heart. I rolled the whole thing in colored sugar which helped to knock down the edges and enhance the heart shape. Despite the dubious ingredients, these were a tasty buttery cookie with a pleasant strawberry flavor and perfect for Valentine's Day!

Strawberry Jello Heart Cookies
Adapted from Cast Sugar's Cherry Almond Jello Cookies, her recipe came from Gelatin Spritz Cookies from All Recipes
Makes ~4 dozen cookies

1 1/2 cups (12 oz) butter (Earth Balance margarine in our house)
1 (3 oz) package strawberry Jello
1 cup sugar
the scrapings from 1 vanilla bean
3 1/2 cups all-purpose flour
1 teaspoon baking powder
1 egg
1 teaspoon vanilla extract
colored sugar, optional

-Cream the butter/margarine with the sugar, Jello powder and vanilla bean scrapings until light and fluffy.
-Stir together the flour and baking powder and set aside.
-Add the egg and vanilla extract to the creamed butter/EB and beat until combined.
-Add the flour mixture and beat until the dough is smooth and even. *If you have a cookie press they can be baked as spritz cookies at this point.
-Place a third of the dough on a large sheet of plastic wrap, shape into a log ~2 inches in diameter and wrap tightly in the plastic wrap. Repeat with the other two thirds of the dough. Refrigerate for at least 2 hours, overnight is better to develop the vanilla flavor.
-Preheat your oven to 400 degrees.
-Remove one log of dough from the fridge and cut out a small groove on one side, this will form the top indent of the heart. Turn the log over and trim a little on the sides to form a point.
-Roll the log in the colored sugar. You will need to pour some colored sugar into the groove to get it to stick in. Be gentle so you don't destroy the details of the heart.
-Slice 1/4 inch slices from the log and place them on a parchment lined baking sheet. Leave an inch between each cookie.
-Bake for 6-9 minutes, until they puff slightly and the bottoms are very light brown. Cool on the baking sheet for 1-2 minutes and then remove to cool completely on a wire rack.
-Repeat the process with the remaining dough. The dough will keep well in the fridge for up to 5 days and the vanilla flavor will improve with longer refrigeration.

My cat Abbie has a heart shaped spot on her nose, isn't she the cutest thing ever!!

February 9, 2009

"Forget Me Not" Sambusik Cookies

I'm not a big cookbook collector, it takes a really impressive collection to get me to commit to buying one. There are just too many recipes to try online, in magazines, etc. However, I leap at the chance at anything new to read that is food related. Fiction involving food is always welcome but the genre I really love includes the histories, science discussions and memoirs that revolve around food. My favorites are too many to list but here are some examples you might recognize: On Food and Cooking, Kitchen Confidential, Salt, Garlic and Sapphires, My Life in France. Just point me in the direction of a new book of this nature and a few days later I'll be on the couch devouring it-- it'll only be hours if it's available on the Kindle.

So I loved hearing about the Cook the Books Club. The club's current book is The Language of Baklava by Diana Abu-Jaber. It's an engaging story of the author's childhood experience that centers around the experiences related to her Jordanian father. The recipe I really wanted to make was the "Nostalgic Chicken Livers", chicken livers with onions and lemon juice cooked in olive oil. It's a dish I order regularly at the various middle eastern restaurants around Detroit and I make it at home all the time. But, have you ever tried to take an attractive picture of chicken livers? I tried, but...

So I decided to play with her Sambusik cookies instead. To make them dairy-free I substituted walnut oil for the clarified butter. This gave the exterior dough a lot of walnut flavor. I also swapped orange flower water for the rose water. Rose water reminds me of a high school French teacher that wore too much rose perfume and I find it cloying. I think the orange flower water goes very well with the walnuts. The cookies were delicious with an enchanced walnut flavor. I think they might be even better with a touch of cinnamon as well. Here's my interpretation of her recipe.


My version of "Forget Me Not" Sambusik Cookies
Adapted from The Language of Baklava
Makes ~2 dozen cookies

Filling:
3/4 cup ground walnuts, lightly packed
1/4 cup sugar
1/2 teaspoon orange flower water

Dough:
1/2 cup walnut oil
6 tablespoons milk (soy worked fine)
2 tablespoons + 2 teaspoons sugar
2 cups all-purpose flour

~ 1/2 cup powder sugar to dust

-Preheat your oven to 350 degrees F.
-Stir together the filling ingredients and set aside.
-Mix together the oil, milk, and sugar. Add the flour and knead a small amount until a smooth dough forms.
-Roll the dough out to 1/4 inch thick and cut out 2 inch circles of dough. Fill each circle with approximately a teaspoon and a half of the nut filling. Fold over the circle of dough and pinch together. Bend to form a crescent shape.
-Bake for 15-18 minutes until lightly browned on the bottom.
-Cool and dust with powdered sugar.


I'm adding this to Bookmarked Recipes, an event started by Ruth of Ruth's Kitchen's Experiments. Visit the new Bookmarked Recipes site for the roundup of other bookmarked and tested recipes. And give some of your saved recipes a try and post about them! I'm hosting in a couple of weeks.

February 8, 2009

Building a dream kitchen feels like...

..the night before the first day of school. You have the perfect new outfit. Your backpack is stocked with sharpened pencils and a brand new Trapper Keeper (or a knockoff as the case may have been). Everything is laid out and ready but that can't guarantee that the day will go well so you excitedly fret and can't get to sleep. Now imagine that you've been getting ready for that first day for months, no say over a year plus the couple of years it took to find the outfit. And make it so that your closet is five hours away.

I'm building the house I've dreamed of my whole life, on rolling acreage in the country that my husband and I hunted for years for. The house has been in the planning/building stage for over a year and now the walls are being painted and the kitchen is starting to come together and I'm five hours away!! I'm not sure when I'll sleep next.

More about the house at Building on Dog Hill with kitchen details at Plans for my new kitchen
*Thanks to my builders for these photos!

The kitchen taking shapeThe cabinets for the range and hoodThe cabinetry for the fridge and ovensThe message center cabinetry; mudroom to the left, walk in pantry to the rightThe island cabinetsMy soon-to-be prep area

February 3, 2009

Avocado Pudding with Spicy Cashews

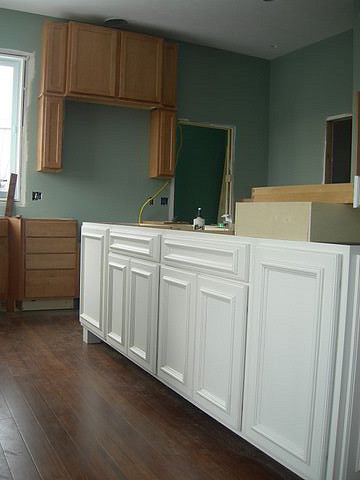
A stop by the great blog Balance this morning made me realize I've hesitated for far too long in making a sweet avocado dish. The author Chou has a superfood challenge posted and the task is to use avocado (the superfood) in a dessert. Luckily I had a perfectly ripe one waiting in my fridge and so today was the day.

I decided to make a pudding with lime because it's a familiar flavor often found in dishes with avocado. I also felt like using honey to sweeten, because I'm randomly on a unrefined/natural sweetener kick this week and I have this really good local raw honey. To thin the pudding I used my most recent nut milk creation. It's a third each soaked cashews, pecans and almonds and MAN is it good!! If you aren't into making your own nut milk then I would use almond milk, rice milk or water. Soy milk would alter the taste too much, as would cow's milk if that were an option for you. I wanted to gild the lily so I tried the pudding with some candied ginger but it wasn't what I was looking for. Then I found some Cajun spiced cashews in my pantry. I bought them to snack on but they are way too spicy on their own. However the nuttiness and heat were perfect in the pudding. It was a great combination of sweet, tart and spicy with the creamy richness of the avocado.

As much as I liked the pudding, I was extremely doubtful that either of my two taste testers, my husband and son, would go for this. I was so skeptical I made my husband try it with his eyes closed, so he wouldn't guess that it was avocado. But he actually liked it and thought it tasted like flowers!? I think that came from the very floral Shadowland raw honey I used, a Michigan product. It was his idea to mix some of the nuts into the pudding. I scoffed at this because they looked prettier on top but then found that it was better that way. Unfortunately, I mixed all the nuts in before letting my son Alex have a taste. Surprisingly, he really liked the pudding as well and asked for a bowl! Alas, that was ruined when he got a piece of spicy cashew and ran for water. I'll be getting more avocados and making a non-spicy version for him soon. Don't be afraid of avocados in dessert and give a new recipe a try. You can join the Superfood Challenge #1 Avocado or see next week's superfood challenge on Feb 8th at Chez Us.

Here are some more sweet avocado recipes from my saved recipe collection on Delicious:
Alton Brown's Avocado Buttercream Frosting
Butterless Avocado Brioche from Holy Cow!
Vegan Avocado Fudge!! from The Vegan Diet
Raw Chocolate Avocado Mousse Ice Cream from Vegan Cookbook Critic
Coconut Milk and Avocado Ice Cream from The Perfect Pantry
Avocado Gelato from Epicurious

Avocado Pudding with Spicy Cashews
Makes 2 small servings

1 small to medium (4-5 oz) Hass avocado
1/2 cup nut milk or rice milk (I used my fresh unsweetened mixed nut milk)
5 teaspoons (35 g) honey or agave nectar
4-5 teaspoons lime juice
1 teaspoon lime zest
1/4 teaspoon kosher salt
1 oz (~2 tablespoons) finely chopped spicy roasted cashews, or use plain roasted cashews and a small pinch of cayenne pepper

-Blend the avocado, milk, honey, lime juice, zest and salt together. Scrap the sides of the container a couple of times and continue blending until smooth. Taste and add additional honey for sweeter pudding.
-Stir in half of the cashews and spoon into two bowls. Top with the remaining cashews.
*If you are making this ahead of time, store it in the fridge and press a sheet of plastic wrap onto the surface of the pudding to prevent browning.

Shadowland Honey is some of the best Michigan honey I've found.
Unfortunately, they don't have the raw honey available online, I got mine at Oryana in Traverse City.

February 1, 2009

Almond Applesauce Bread

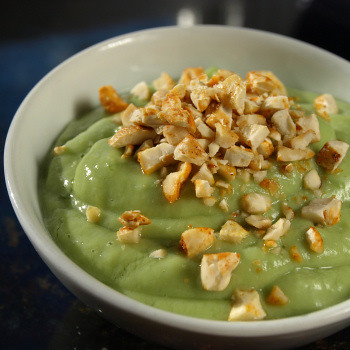
I was lucky enough to win a prize from this year's Menu For Hope and it arrived this past week. The prize I won came from Heidi Robb of Life in Recipes. It included an almond milk making kit, 2 beautiful hand-thrown mugs and an autographed menu from Michael Symon. I've been wanting to make my own nut milk for awhile, so I was excited to try my kit immediately. For my first batch of milk I followed Heidi's recipe. It was so much more flavorful than the boxed and a real treat. The way I liked it best was in my morning hot cereal. I kept the almond pulp as well and wanted to find a way to use it up. Through the convoluted pathways of my brain, an applesauce quick bread was born.

I've been trying to use up the remaining summer stores in our freezer. I had a couple of packages of homemade applesauce from my son Alex's enthusiastic apple picking this past fall. No one in our house will eat applesauce straight up except for me so I needed to repurpose it. In browsing the recent Daring Baker entries I visited a site with a parsnip cake sweetened with dates. Mix together those ideas in my head and out came an applesauce bread with almond milk pulp, sweetened with dates. Wonderfully the experiment was successful! Though the sweetness is much more subtle compared to the often cake-like banana breads it was just sweet enough for me. It also was moist and the almond pulp gave it a little chewiness. The bread was a big hit with my husband as well. I tried the recipe again with pre-ground almond meal and it works well but you do lose the fiber from the almond peels that are included in the milk pulp. I hope to keep making weekly batches of almond milk and more variations on this bread. Thanks Heidi!

More...
Creamy Nut Milk recipe from Life in Recipes
I love Bob's Red Mill High Fiber Hot Cereal. It was fantastic made with homemade almond milk!
My next batch of almond milk will be date sweetened per a recent Raw Comfort Foods Class I attended.

Almond Applesauce Bread
This is subtly sweet and very flavorful. It was developed as a way to use up the pulp leftover from making almond milk but works just as well with other ground almonds or almond meal.
Makes 1 (8-inch x 4-inch) loaf

4 oz (~2/3 cup) pitted dates
1 cup whole wheat pastry flour
1/2 cup all-purpose flour
1 teaspoon baking soda
1/2 teaspoon baking powder
1/2 teaspoon salt
1 teaspoon cinnamon
1/2 teaspoon allspice
1 1/2 cup unsweetened applesauce
1/4 cup Earth Balance margarine
2 eggs
1 cup almond meal (or wrung out pulp from making almond milk)

-Preheat your oven to 350 degrees F.
-Soak the dates in warm water for at least 10 minutes.
-Sift (or whisk) together the flours, baking soda, baking powder, salt, cinnamon and allspice. Set aside.
-Place the applesauce and the dates (with the extra soaking water strained off) in the bowl of a food processor and process until the dates are chopped and evenly distributed. *You could also try doing this step in a blender and then mixing the rest of the recipe by hand but I used the food processor to make fewer dirty dishes.
-Add the margarine and process until combined. Add the eggs and again process until combined. Add the almond meal or almond milk pulp and pulse to combine.
-Add the flour mixture to the food processor in three stages, pulse 1-2 times after each addition. Then pulse until all the flour is combined with the wet ingredients.
-Coat a 8"x4" loaf pan with spray oil and spoon the batter evenly into the pan.
-Bake for 40-45 minutes, or until a toothpick inserted in the loaf comes out clean.
-Cool for 5 minutes and then remove the loaf from the pan and cool thoroughly on a rack before slicing.

These recipes were helpful/inspirational:
Applesauce Nut Bread from Baking Bites
Parsnip, Date & Banana Cake (vegan and gluten-free) from Creative Recipes for Wandering Minds

Isn't this mug fantastic!! See more beautiful pottery at Ellen Shankin Pottery.
(And yes, that's homemade almond milk in the mug.)Bonus Abbie shot