 The March 2009 challenge is hosted by Mary of Beans and Caviar, Melinda of Melbourne Larder and Enza of Io Da Grande. They have chosen Lasagne of Emilia-Romagna from The Splendid Table by Lynne Rossetto Kasper as the challenge.
I was surprised to learn this month's Daring Baker challenge. Baking to me means cookies, cakes, bread, and pie--I guess sweets just naturally dominate my brain. Making lasagna seems more like cooking than baking and it's one of those dishes that relies on cheese to make it so delicious. I've made a few dairy-free lasagnas for my son but they were bare bones dishes: layers of meat with sauce, a layer of broccoli (one of the two green vegetables he deems edible) thrown together with dairy-free soy cheese and noodles from a box. Certainly nothing exciting enough to post.
However the challenge of making my own spinach lasagna noodles kept me motivated. I've made a lot of pasta for homemade ravioli and pierogi and occasionally for hand cut noodles but have never attempted spinach pasta or making the large sheets needed for lasagna. So I took that spark of excitement and decided to wing the rest.
A look at my mostly bare fridge gave me the idea to replace the meat ragu with a
tempeh version. This I spiced with a secret ingredient of mine, Italian sausage seasoning. The fennel and pepper taste is great with green vegetables and in homemade meatballs for soup. Poking further I found a forgotten celery root and had another bright idea. Typically vegans and those who eat dairy-free replace soy milk in the milk-based bechamel sauce found in lasagna, but the taste has never been top on my list. The flavor of celery goes so well with tomatoes and I knew it can be made into a super smooth puree. So I spiced it up bechamel-style with nutmeg and white pepper to use in my lasagna.
The spinach pasta wasn't the walk in the park I expected. I'm not sure if I chopped my spinach too fine or if I just had very juicy spinach but I needed a lot of bench flour to get the pasta dough workable. It was really sticky! Eventually it worked out and I was really happy with how thin I got my sheets of lasagna noodles. The color on the cooked noodles was impressive too. It has me ready to try again and make spinach tagliatelle with basil pesto.
I thought about replacing the Parmesan called for in the recipe with oil and garlic toasted breadcrumbs, something I'd seen on
Kalofagas recently, but laziness won out and I used some
Follow Your Heart vegan mozzarella cheese. The melded taste of the spinach pasta, rich tempeh sauce with the creamy cheese and celeriac puree was wonderful. Everything was gooey and the flavors mingled so well. The celeriac bechamel has renewed my interest in making dairy-free lasagna. Once again, I'm happy the Daring Bakers pushed me in a new direction.
Links:
-For the complete original recipe visit this month's hosts: Enza of
da grande, Melinda of
Melbourne Larder and Mary of
Beans and Caviar.
-The author of the original recipe is Lynne Rossetto Kasper, you can find her online at
The Splendid Table.
-See more lasagna creations by visiting the
Daring Bakers' Blogroll.
-If you'd like to join in or learn more about the group, come see the gorgeous new site:
The Daring Kitchen.
 My Instructions for LasagnaThis is my adaptation of Lasagne of Emilia-Romagna (Lasagne Verdi al Forno) from The Splendid Table: Recipes from Emilia-Romagna, the Heartland of Northern Italian Food by Lynne Rossetto Kasper.
Makes one 8-inch square lasagna that will serve 4
Ingredients:1 half-recipe of
Spinach Egg Pasta or one full recipe of
Vegan Pasta, spinach variation, see links for recipes*
1 recipe of Celeriac Puree for Lasagna, see below for recipe (increase amount as desired)
1 recipe Tempeh Ragu, recipe below
5 ounces
Follow Your Heart vegan mozzarella cheese
*You can begin by making your pasta and letting it dry while you make the fillings or by making the fillings and then setting them aside or refrigerating and reheating them while you make the pasta. I made the pasta first and allowed it to dry only slightly. That is how these directions are written so I can remember what I did for next time.
1. Prepare your lasagna noodles. I used half of the provided recipe for Spinach Egg Pasta (Pasta Verde). You can see the complete recipe with instructions
here. The ingredient amounts for a half recipe are: 1 egg, 5 ounces of fresh spinach, and 1 3/4 cups (7 ounces) of all-purpose flour. I needed more flour to make the dough workable and not crazy sticky. There will be a little dough leftover. You can cut it into noodles and save it for later or just cook it, throw some butter/EB on it and have a snack. For a vegan/egg-free option, try this
Vegan Pasta Recipe, scroll down for the spinach version. This should give you more than enough and some extra pasta as well.
2. After your pasta is made and set aside to dry a little, make your fillings. My recipes are included below. Set the finished fillings aside.
3. Preheat your oven to 350 degrees F and bring a large pot of salted water to a boil. When the water comes to a boil, prepare a large bowl of ice water and spray an 8-inch square baking pan with spray oil.
4. Grate 5 ounces of
Follow Your Heart vegan mozzarella cheese and set aside.
5. Boil the lasagna noodles for 2 minutes. *If you dried the noodles overnight or longer, then you should boil them for 4 minutes. Cook just 3-4 noodles at a time, transfering them with a handled strainer to the ice water when done.
6. When your noodles are ready, lay a thin layer of the celeriac puree onto the bottom of the baking pan and cover it with a few layers of noodles. If you get your noodles very thin use 2-3 layers of noodles. If they didn't come out as thin, use just 1-2. I recommend straining and patting the noodles a little with a clean dish towel or paper towel to avoid making your lasagna watery.
7. Add another layer of puree and top it with a layer of ragu then sprinkle on 1/3 of the cheese. Add another couple layers of noodles and repeat the puree, ragu, and 1/3 of the cheese. Top with a final layer of noodles. Spread the remaining celeriac puree on to the top of the lasagna and sprinkle over the rest of the cheese.
8. Cover with aluminum foil, making sure the foil doesn't touch the surface of the lasagna. Bake in the center of the oven for 40 minutes. Remove the foil and bake for another 10 minutes.
9. Turn on your broiler and raise the lasagna to the top rack. Broil for 1-3 minutes to brown the vegan mozzarella, checking every minute so that it doesn't burn.
10. Remove the lasagna from the oven and cool for 5-10 minutes. Cut and serve.
Celeriac Puree for LasagnaFor use as a dairy-free bechamel sauce replacement in a 8-inch square lasagna. I plan to make this again and use a slightly larger celeriac or two roots because I think more would be good in the lasagna. This amount melded in nicely though.Makes ~1 1/4 cups
8 ounces of peeled celery root (celeriac), from ~12 ounces unpeeled root
1 clove of garlic, whole and peeled
2 tablespoons Earth Balance margarine (or butter if you want/can)
1/4 teaspoon freshly grated nutmeg
1/4 teaspoon freshly ground white pepper
-Chop the peeled celeriac into a 3/4 - 1 inch dice. Place in a pot with the garlic clove and add enough water to cover. Season the water with salt until it tastes as salty as tears.
-Bring the pot to a boil and boil ~7-9 minutes, until the celery root is tender all the way through. You can check this by stabbing a piece with the tip of a knife.
-Remove the pot from the heat and drain the water off. Save 1/4 cup of the cooking water.
-Place the drained celeriac and garlic into a food processor and add the margarine (or butter) and 2 tablespoons of the cooking liquid. Process until smooth. This could be done in a blender as well.
-Check the puree to see that it is the consistency of soft mashed potatoes, add more cooking water if needed. Add the nutmeg and pepper and process to distribute. Taste for seasoning and add salt, more nutmeg or pepper if desired.
-Store for assembly later in the fridge or use shortly. The puree should be warm when added to the lasagna.
Tempeh Ragu for LasagnaMakes ~2 cups, enough for one 8-inch square lasagna
8 ounces of tempeh (I used
LightLife 3 grain but I really like their flax and wild rice versions too)
1 teaspoon olive oil
1 clove of garlic, grated on a microplane or smashed into a paste with a knife or garlic press
1/2 teaspoon
Penzey's Italian Sausage Seasoning*
1 1/2 cups pasta sauce (I used my homemade sauce, look for a sauce that isn't very chunky and is fairly thick)
*This is a mixture of ground fennel seed, salt, pepper and a little sugar. You can replace it with a home mixed version of those ingredients or just use whatever pasta herb/spice seasoning you prefer, just add to taste.
-Pulse the tempeh in a food processor until it forms a coarse meal, think Grape Nut size. You can also grate the tempeh on the large holed side of a grater.
-Heat the oil in a skillet until a crumb of tempeh sizzles a little when added. Add all the ground tempeh and cook over medium-high heat until at least half is golden brown, stir often. This should take 2-3 minutes.
-Turn the heat down to medium-low and add the garlic and sausage seasoning. Stir to distribute and heat just until the garlic becomes fragrant.
-Add the pasta sauce. Cook on medium high until bubbling and hot, cook and additional 2 minutes, stirring occasionally.
-Remove from heat and allow to cool slightly or store in the fridge for use later. Like the celery root puree this should be added to the lasagna warm.
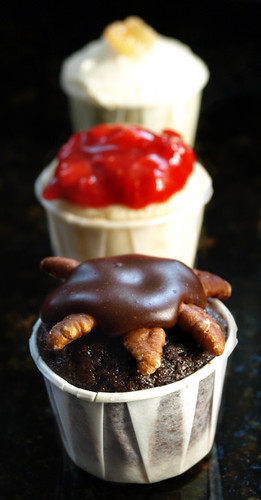
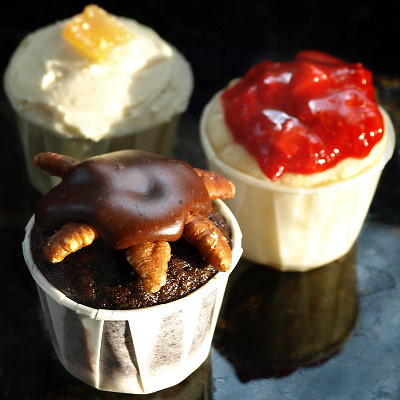
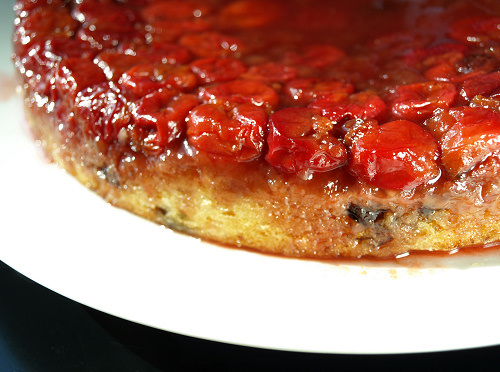
Making the spinach pasta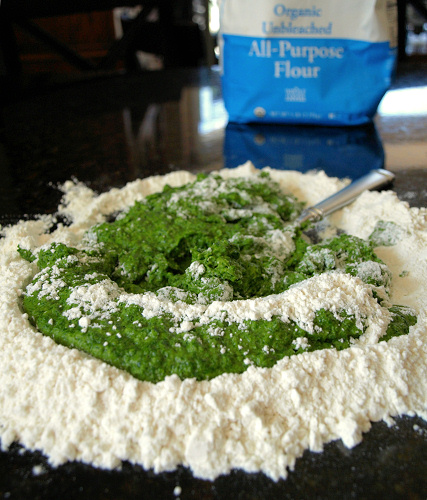 Rolling out the lasagna noodles
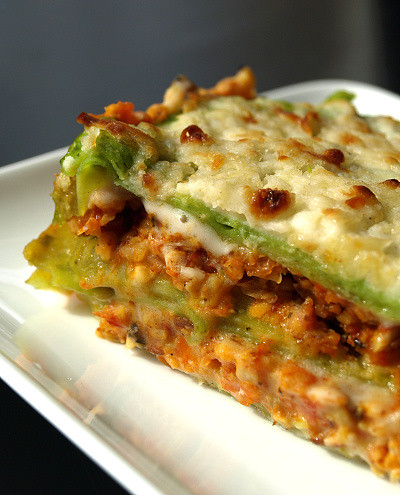
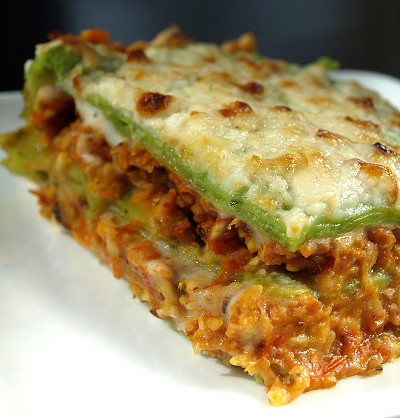
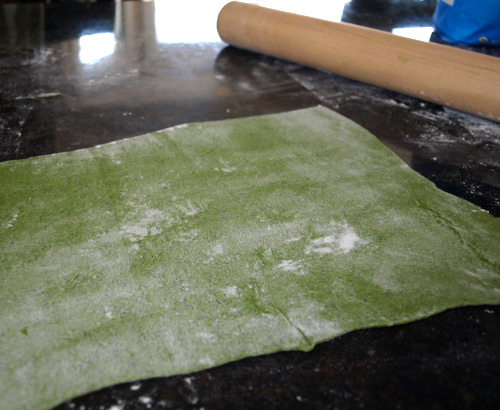 A slice of finished lasagna

 Nope, not finished yet... but our new house (and my new kitchen) are getting very close to being done. We went up to visit last week and got to see a lot of the lighting going in. It was also our first look at the faucets and countertops. With all the work going on a lot of things were covered up but I did get some pictures to show. This coming week they'll be finishing up in some rooms and soon it will be ready for the final inspection. Here's what I have to share.
 I had to pull away some of the cardboard to take a peek while I was there. I love the modern looking drain board on the main sink. And my view!!
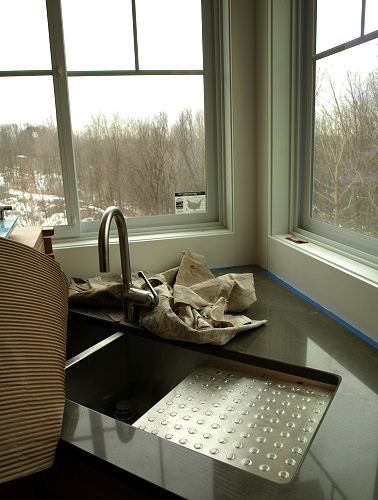 The range is in place but not hooked up yet.
 Ovens in place, ignore the dust.
 My son and husband love the ice maker. Alex kept snatching ice cubes.
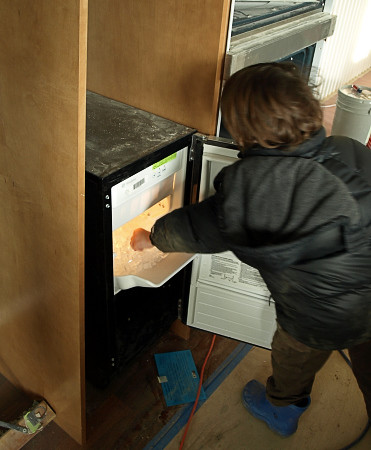 The tile for the backsplash was delivered. It's from Trikeenan Tileworks and will look similar to this in place.
 The breakfast nook light, pulled up to be out of the way it will be lowered later
 The schoolhouse style lights over the island
 Check out the cute hat from Christo (aka doggybloggy) of ChezWhat?
 When I read that Shelly of


 I cook corned beef fairly regularly so when Saint Patrick's Day came around I wanted to come up with another food to celebrate the holiday. I saw a recipe for Wholemeal-Almond Biscuits featured as the Martha Stewart Cookie of the Day and it seemed like a wonderful twist on digestive biscuits, which I love. I wanted to use up some oat flour and thought it would give these a nudge towards being more Ireland-inspired.
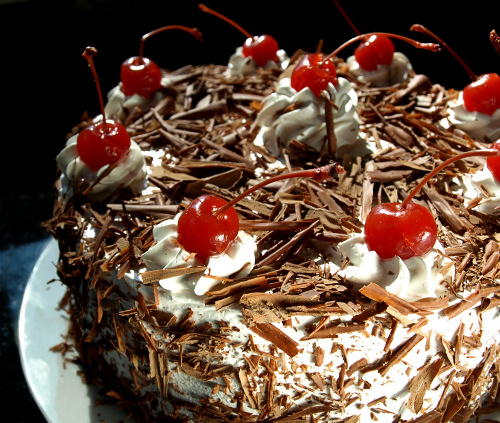 I love getting the honor of cake duty. It gives me a chance to bake something and it's a relief knowing there will be cake for my dairy allergic son to enjoy. While I know my stuff when it comes to making a cake tasty I'm unfortunately still learning a lot about layer cake construction and decorating. About a month ago I made a cake for my niece and nephew's joint 18th birthday party. It was a layer cake made with my favorite chocolate cake recipe, around here we call it "
 A cut slice of cake: two chocolate layers, a Grand Marnier yogurt cake layer, fudge filling, Traverse City organic sour cherry filling, frosted with Grand Marnier meringue frosting, decorated with semi-sweet chocolate curls and maraschino cherries
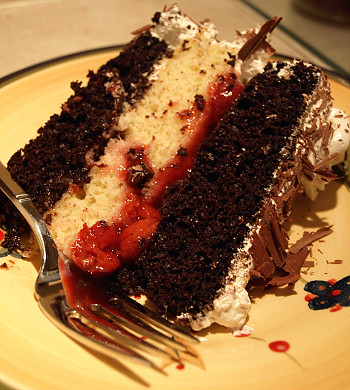

 The hood is in place. Just think of the stuff I can burn and not set off all the smoke alarms.
 The banquet seating is in place. It has four drawers for storage.
 Counter tops!!!
 Apparently I haven't mentioned how cute all the carpenters are. Well here ya go.
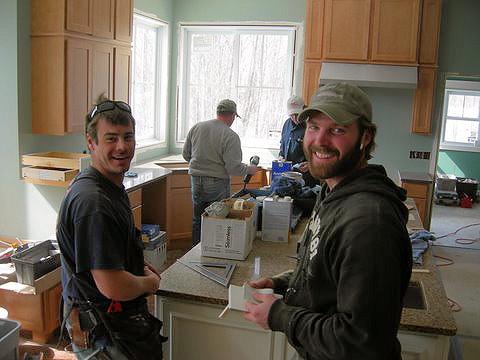
 Despite my denial (and complaining) winter is not yet over in Michigan. I could hear the snowflakes mocking me as they fell yesterday. Well I just had to make some wintery food and prove that I can take it no matter how long it lasts, even though I'm bluffing. In honor of St Patty's Day I had a corned beef brisket in the fridge. I was excited to try a glazed corned beef recipe that Kevin posted recently on his blog


 This is my submission for the
 *Ok not really, I teased her with a cat toy but I'm sure happy spring is on the way.
 I'm sick with my first cold in over a year and really ready for winter to be over. In the past months I've paid my dues eating lots of local rutabagas and turnips but now I need a break. So I'm indulging myself with blood oranges and herbs from points south. Have you seen the prices on blood oranges? Just a few years ago you'd have to pay a buck an orange and now they're less than $2 per pound. Of course the ones on sale are tiny but they're still a nice break from Midwest winter food.