Showing posts with label Blog Event. Show all posts

November 9, 2011

August 17, 2011

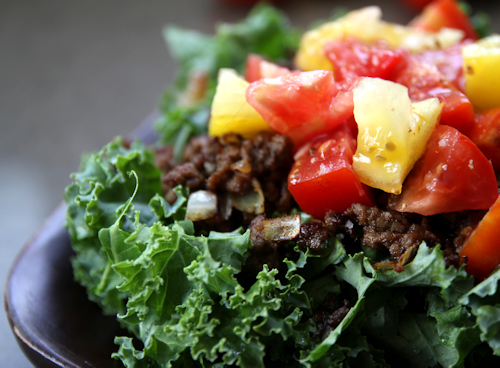
Fragrant Beef Salad

It's been awhile since I've put forth an entry for the Mother's Kitchen Spice Rack Challenge, but her entertaining post and my love for cumin were inspiration to get me moving.  This past winter I was trying to think up new ideas to use the ground beef from the steer share we purchased.  I remembered the spiced beef from a Middle Eastern bakery near one of our previous homes in Sterling Heights, MI.  This bakery served spicy beef on top of brick-oven fired pizza dough with slices of fresh tomato.  (They have to-die-for cheese breads as well but those are now merely daydreams from my previous life as a dairy eater.)  I used my memory to try and recreate the flavor of the meat and it became a favorite dish this past winter.   The main spice is cumin so this is a perfect dish for this month's challenge.

Fragrant Beef Salad
Inspired by the meat flat breads from Maatouk Bakery.  This is my taco salad use for the spiced meat, of course you could use the beef on top of pizza dough like they do or like taco meat in tortillas.
Makes 2-4 servings depending on your hunger

1 pound ground beef, ground lamb is also wonderful
1 large onion, chopped
~6 cups greens (spinach, arugula and kale all work well)
1 1/2 cups chopped fresh tomatoes
2 1/2 teaspoons ground cumin seed
3/4 teaspoon ground cinnamon
good extra-virgin olive oil
freshly ground black pepper (or a pinch of cayenne)
salt

-Brown the meat, preferably in a cast iron skillet.
-When browned and mostly cooked add the onion, spices, salt and pepper.  Add a little olive oil if needed to lubricate the onions so they will cook well.   Stir and cook over medium high heat until the onion is soft and browned a little.  Taste for seasoning and add more salt, pepper and spice as desired.
-Wash, chop and dry your greens.  Top the greens with the beef mixture and then top with the tomatoes.
-Season the tomatoes with salt and pepper and drizzle over olive oil to dress the greens.  Enjoy!

Even though I miss the ocean there are some pretty great consolation prizes here at home- the tomatoes, kale and onions in this salad are all fresh from my garden.

June 17, 2011

Mint and Melon

This month's Spice Rack Challenge is mint.  I have my vegetable garden planted and school done for the summer so I should be able to find a few moments to blog here and there.  I have my two favorite mint combinations blogged already, mint/chocolate and mint/lamb so I had to think of what else I like to do with mint.   I think mint is wonderful in any fruit salad and mint and melon are especially good together. Here is my non-recipe for fruit and mint, of course it's simple but I need a baby step right now.

Mint and Melon
  1. Seed, peel and cube melon
  2. Chiffonade fresh mint leaves
  3. Toss with citrus juice and a little zest (I like orange or lime for this)
  4. Eat
My other mint recipes:
Mint Coconut Milk Ice Cream with Gluten-free Chocolate Cones
Quinoa and Blood Orange Salad
Candy Cane Cocoa
Winter Mint Cookies
DB Lavash Crackers w/ Moroccan Carrot Dip
Heartnut and Wild Rice Salad
Cherry Tomato and Mint Salad on Lamb Steaks

March 23, 2011

Raspberry-Oat Teacakes (gluten-free)

Psst, guess what-- I have a little girl!!!  And that means that I can dream of talking about clothes, of having tea parties and sleepovers and maybe even of playing together with makeup, when she's 18 of course.  In anticipation of all this we took the first step and bought Penny her first tea set recently.  So far she loves carrying around the cups and hiding things in the teapot but I thought I'd put it to better use and make some mini teacakes.

The idea came from the recent request from Foodbuzz for tea party recipes.  Foodbuzz is donating $50 to the Ovarian Cancer Research Fund for every tea party inspired recipe created by a feature publisher before March 23rd and I'm making it just under the wire.   I really had no idea what a "teacake" was and in this case the internet wasn't much help, even Wikipedia struggles for an answer.  So I went to the source of all baking knowledge, Martha.

I based my mini teacakes on Martha's recipe but tweaked them to be nut and dairy free.  We are just beginning to try coconut oil on Penny and this is really her only taste of sugar so far, outside of a little maple syrup.  But it's her birthday week and I feel like being indulgent.  The mini cakes are not too sweet, a little denser than your average muffin with a slightly crisp exterior.  I love the oat and raspberry combination and it completely won over Penny and her older brother. Now we just need to whip up some deviled eggs, one of Alex's favorite things to make on his own, and a spot of tea to have our petite fĂȘte.

Links:
-Visit Kelly Confidential and you can play make believe and host an imaginary tea party at Kelly's Tea Party for a Cause. When you do, Electrolux will donate $1 to the Ovarian Cancer Research Fund.
-A friend runs a tea directory online at Now Serving Tea.  Take a look at her site for information on tea rooms, tea houses, tea shops, tea crafters, tea farms, tea retailers, and restaurants serving tea.
-How about some homemade chai tea with your tea cakes?  This recipe from intellectual relish uses black cardamom.  

Raspberry-Oat Tea Cakes
Based on the recipe for Tiny Cherry and Almond Tea Cakes from Martha Stewart Living, July 2007
Makes 12 mini muffin sized cakes

4 tablespoons coconut oil
8 tablespoons processed oatmeal*
5 tablespoons sugar, I used coconut sugar
4 tablespoons brown rice flour
3 tablespoons potato starch
3/8 teaspoon salt
2 egg whites
1 teaspoon vanilla extract
12 frozen raspberries

*I ground rolled oats in a food processor to a cornmeal consistancy.  Please be sure that your oats come from a gluten-free source if you have health concerns.

-Preheat your oven to 400 degrees F.  Grease and flour a mini muffin tin with coconut oil and potato starch.
-In a small saucepan, melt your coconut oil and then remove from heat.
-In a medium sized mixing bowl, whisk together your oatmeal, sugar, rice flour, potato starch and salt.  Set aside.
-In another medium sized bowl, whisk your egg whites just until frothy.  Add in the dry ingredients and vanilla extract and whisk until the batter is smooth.  Then drizzle in the warm coconut oil and beat until a uniform smooth batter is created.
-Spoon the batter into the prepared muffin tin and then press a frozen raspberry into each cake, you don't need to push the raspberry all the way into the batter.
-Bake for 11-12 minutes until they toothpick test done.  Cool for 5-10 minutes in the pan and then remove to cool on a rack.
-Serve with tea and maybe some deviled eggs, if that tickles your fancy.
 Penny gives me staging advice, right before she made off with the teapot lid!
I'm adding these to Simply Sugar and Gluten Free's Slightly Indulgent Tuesdays

March 21, 2011

In anticipation of spring-- and Ramps!

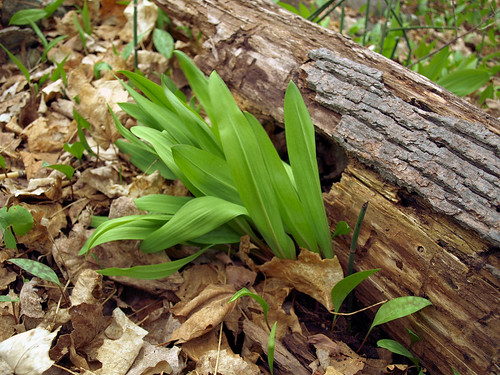
Michigan's Spring has just barely poked her toe out from under the blanket of winter.  So when Shayne of fruitcake or nuts asked us to post about our favorite spring food it all had to come from memory.  As much as I'm enjoying tapping our maple trees what I really long for is the first green things sprouting up and one of the first is ramps!

In past years ramps have become something of a foodie cliche because of their rabid fans, but I think most of the adoration is well deserved.  Fresh and green with that pungent combined garlic/onion flavor, who could hate this gift that pops up from under the leaf litter.  My favorite part is the leafy greens.  Like garlic scapes, they have a verdent flavor that I love.  Here is my favorite quick meal to make with them.

Ramps and Beans 

Rinse and spin or pat dry a bunch of ramps.  Chop your ramp stems and bulbs separately from your greens.  Add the chopped bulbs and stems to a pan with a couple of glugs of good olive oil and salt and pepper.  Cook until softened.  Add in about two cups of cooked white beans (navy or cannelini) and cook to warm up the beans.  Add in the ramp greens and cook just until they are tender.  Add a splash of lemon juice, more olive oil and more salt and pepper to taste.  Great served with a fried egg on top or spooned onto crusty bread.

*See the other favorite spring foods on the group blog for Michigan Lady Food Bloggers at the end of this month.
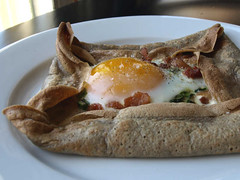
**I'll also be remaking these Buckwheat Crepes with Ramps this year, but this time around I'm going to hunt down a wheat-free all buckwheat crepe recipe. 
***And since I have no pictures of the food, here's a little video of Penny pushing around her toy shopping cart.  (Please ignore the voice over at the end contributed by her annoying older brother.)

March 18, 2011

Trying Black Cardamom (with a fish recipe)

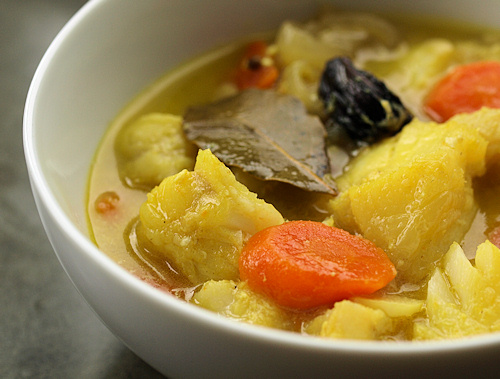
This month's Spice Rack Challenge was cardamom.  Cardamom seemed like a simple spice to pick a recipe for but I've always used it in a prepared spice mix (like garam masala) or in a sweet baked good.  When I saw the many types of cardamom listed for the challenge I was determined to give a new one for me a try, black cardamom.  Not directly related to green and white cardamom, I'm still making up my mind about this interesting spice.  I love it's smokiness, especially since I'm avoiding my beloved spicy smoked paprika while nursing, but when I tried using the inner seeds ground I found it too camphorous and unpleasant.  I'm going to use the rest of my stash to make some homemade garam masala or maybe some more of this cod, which was my one success.

Black Cardamom Cod
Makes ~3 servings

1 lb Pacific cod or other firm white fish, cut into large chunks
1 cup coconut milk
2 teaspoons coconut oil
1 small onion, sliced
2 carrots, peeled and sliced
2 cloves garlic, sliced
3 whole black cardamom pods
1 tablespoon grated fresh ginger root
1 bay leaf
1/4 teaspoon freshly ground green cardamom seeds
1/4 teaspoon whole coriander, toasted and then ground
1/8 teaspoon ground turmeric
salt and freshly ground pepper

-After you toast and grind your coriander, add the oil and onion with all the spices including salt and pepper to a heavy saucepan.  Cook to soften slightly.  Add the garlic and cook until fragrant.
-Add the coconut milk and carrots and taste for salt and pepper.  Then bring up to a strong simmer, cover and cook until the carrots are almost done.
-Add the fish and cover.  Cook until the fish is just cooked through.
-Serve over rice or cauliflower rice. Either remove the black cardamom pods and bay leaf before serving or warn your diners that they are not to be eaten.


Links:
-Other cardamom recipes I have online are my Danish Braid and from way back these Cardamom and Candied Ginger Shortbread. I've been blogging for over three years now!
-I procured my black cardamom from The Spice House.
-Visit Mother's Kitchen next Wednesday for the collection of cardamom recipes.

February 20, 2011

Kitchen Gadgets

This month my fellow Michigan Lady Food Bloggers are talkin' gadgets.  Per the request of Tricia over at Jonski Blogski, we are all going to wax poetically about our favorites. So here are mine:

Black & Decker EK700 9-Inch Electric Carving Knife, White
Great for slicing up a whole loaf of bread or carving beef, ham or turkey.  Or maybe I just remember my grandmother using one and so I had to have one. 

IKEA Produkt Milk Frother cofee/tea
Super cheap and fun for kids to use, this little guy gives them something electric to play with and is way safer and faster to clean than the blender or an electric hand mixer.  Good for mixing hot/cold chocolate milk or beating a few eggs for scrambled eggs/French toast/etc.

Salter 6055SSDR Stainless-Steel Electronic Kitchen Scale

I love when recipes I'm working with start off with weights instead of just volumetric measurements.  It makes it so much easier to convert to smaller batches and it's wonderful not to have a million measuring cups and spoons get dirty.  My big challenge is that I need to pick a side and stick with either metric or imperial measurements.  Metric can be more precise (since my scale doesn't do more than 1/8th of an ounces) but imperial is more instinctive, it's hard to choose.

Stainless Steel Flat Whisk - 8 Inch

Easier to clean than a traditional balloon whisk this little guy gets in corners and doubles as a spatula for items that won't fall through.  The two I have are in constant rotation.

*To see the other gadget recommendations visit our group blog, Michigan Lady Food Bloggers, at the end of this month.

November 2, 2010

Application for Iron Foodie 2010

Iron Foodie 2010 | Here's Why that will be me:
MarxFoods.com -- Fine Bulk Foods The Foodie BlogRoll

Marx Foods and the Foodie BlogRoll are teaming up to sponsor the first Iron Foodie challenge!  25 chosen  contestants will receive a package of 8 ingredients from Marx Foods' exotic collection of edibles.  There could be geoduck or black chicken or baby coconuts or matsutake mushrooms or fennel pollen!!!  Then the contestants will have to use 3 of the given ingredients to create a dish that could win $200 in store credit.  To begin the selection process I'm submitting these five questions so they can evaluate my worthiness.  Cross your fingers for me!

1. Why do you want to compete in this challenge?
I'm addicted cooking competition shows and would love a little taste of the excitement.  My eight year old son and I watch shows together and he would love to be the guest judge and taste my entry. 

2. Limitations of time/space notwithstanding, whose kitchen would you like to spend the day in & why?   Julia Child, Thomas Keller, Ferran Adria, James Beard, Marie-Antoine Careme, or The Swedish Chef?
Marie-Antoine Careme.  I'd love to see the work that went into such elaborate food without the aid of blenders, food processors, stand mixers and all the other gadgets we have today.  It would be fun even if I was turning the spit all day-- I would miss my iPad though. 

3. What morsel are you most likely to swipe from family & friends’ plates when they aren’t looking?
Any crispy pork fat--stray bacon, crunchy end bits from barbecue, a bit of caramelized ham fat.  It's a public service I provide free of charge.

4. Sum your childhood up in one meal.
Cold tofu, cheese pirogi, and butter-dipped steamed artichokes.  As odd as this combination sounds it would not have been unusual for me as a kid.  

5. The one mainstream food you can’t stand?
Store bought cookies.  Cookies are ridiculously easy to make and the store bought ones taste like cardboard.  

July 27, 2010

DB Swiss Roll Ice Cream Bombe

The July 2010 Daring Bakers’ challenge was hosted by Sunita of Sunita’s world – life and food. Sunita challenged everyone to make an ice-cream filled Swiss roll that’s then used to make a bombe with hot fudge. Her recipe is based on an ice cream cake recipe from Taste of Home.

This month's Daring Baker challenge was a layered, Swiss roll covered, ice cream bombe.  Not only was it a fantastic idea to have a baking challenge that included ice cream for the summer but I loved that our host Sunita took a "semi-homemade" recipe and challenged all of us to make it 100% homemade.  Our task included the Swiss roll cake, the cake's filling, two ice creams and a fudge filling.  All were to be made from scratch.

This combination ended up as the biggest smash hit any Daring Baker challenge has ever made with my son!  He flipped over the idea of a rolled up cake, loved the marshmallow frosting I filled it with, and then thought he'd died and gone to heaven when I told him that I was going to add ice cream to this already delicious combination.  Ice cream, whether the homemade kind, from a mix, raw, or Tofutti, is one of his major food groups.

To keep the size of the finished bombe manageable I made the Swiss roll several days earlier then served some of it to friends over for dinner.  It was delicious on it's own and I had to fight off Alex to keep enough of the rest safe to make the bombe.  Over the next few days I sliced and froze the remaining roll and made the two ice creams and fudge.   For the cake I followed Sunita's recipe using half black cocoa, which I will admit to being addicted to.  Since her cake filling was whipped cream based, I replaced it with my own marshmallow frosting.  The cake was chocolaty, spongy and easy to roll without cracking. 

For one of my ice creams I chose to make a strawberry one based on Jen the Leftover Queen's Fruits and Nuts of the Forest Kefir Ice Cream.  I hoped to come up with a probiotic packed version of ice cream that my son would like.  I used So Delicious coconut milk kefir (a favorite in our house for smoothies), a couple of tablespoons of coconut oil + more kefir in place of the cream, only a tablespoon of booze (vodka), strawberries and sugar in place of maple syrup.  I tasted and adjusted the sweetness until I liked the result but after freezing it was fairly hard, more like sorbet.  My son Alex wasn't impressed.  Even with the real sugar, it wasn't rich enough for him.  I'll be making a batch with the nuts, Frangelico and maple syrup next time.  And I won't be sharing!!

For the other ice cream I tried out the "The World's Easiest Dairy-Free and Egg-Free Vanilla Ice Cream" from Speedbump Kitchen.  It definitely lives up to it's name-- melt marshmallows and creamer, cool, freeze-- that's it!  I replaced the soy creamer with So Delicious Coconut Milk Creamer in French Vanilla.  I had my doubts because this creamer's flavor has disappointed me in the past.  But combined with the marshmallow flavor it was pretty good, though a bit too sweet for me personally.  Alex thought it was frozen manna from heaven and would have consumed the whole batch by himself had I let him.

Finally, I attempted to adapt my favorite dairy-free fudge topping to get the perfect sticky, gooey texture like in the ice cream cakes of my youth.  I added a little corn syrup to keep it gooey but then cooked it a bit too long. The result was tasty but more reminiscent of a Good Humor candy center, something I should have played off as intentional.   The fudge layer along with the stiffer strawberry-kefir ice cream made the bombe a pain to cut.  A plate was broken, hilarity ensued, and somehow the bombe survived and was served to the guests at my recent food blogger get together.  Add another notch to my Daring Baker bedpost.  

Marshmallow Frosting (Swiss Roll Filling)
Makes ~2 cups, enough to fill one 10 1/2" x 15 1/1 cake generously

4 egg whites
3/4 cup sugar, super fine is best (or whiz regular sugar in a food processor)
seeds from 1 vanilla bean
5 oz coconut oil, liquid
pinch of salt

-Prepare a double boiler with a large bowl.
-Add the egg whites, sugar and vanilla bean seeds to the bowl and beat for 4-5 minutes until smooth, fluffy and hot to the touch.  This is best done with a hand held electric mixer but it can be done by hand, just be prepared to have your forearms aching.
-Remove the hot meringue from the heat and continue to beat until cool, ~5-7 minutes.  Add salt and then the coconut oil a spoon at a time while beating.
-Beat until very smooth and use fairly soon.  There isn't enough fat to keep the marshmallow completely pliable once it starts to set.

Links:
-For the complete original recipes for the challenge visit our host at Sunita’s world- life and food
-Sunita's from scratch recipes where inspired by the Swiss swirl ice cream cake from the Taste of Home website.
-The two ice creams I made were:  Jen the Leftover Queen's Fruits and Nuts of the Forest Kefir Ice Cream and the "The World's Easiest Dairy-Free and Egg-Free Vanilla Ice Cream" from Speedbump Kitchen (click to see all her other ice cream flavors.)
-I replaced the soy creamer with So Delicious Coconut Milk Creamer in French Vanilla.
-Visit the Daring Kitchen and see other bombes made this month by browsing the Daring Baker Blogroll
A bombe slice
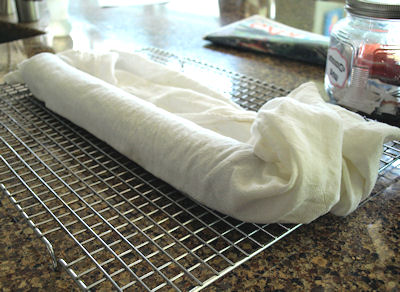
Rolled up cake cooling in a clean sugared dish towel
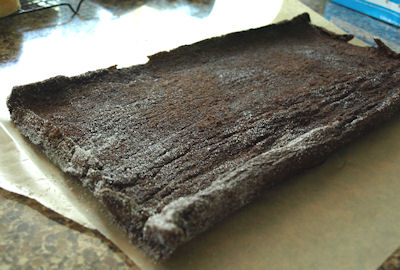
Unrolled cake
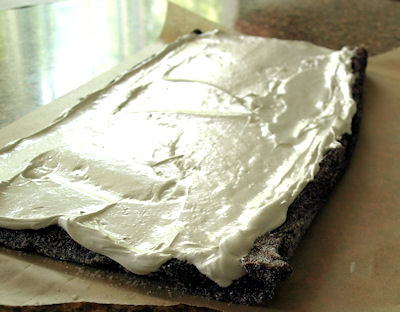
Frosted cake before rolling
*These Amazon links give me a monetary kick back if you buy through them.  They are products I own, use and like.  My endless mentions of So Delicious brand are completely uncompensated. Hey, Turtle Mountain how 'bout some love for this volunteer product tester?

June 27, 2010

DB Chocolate Pavlovas with Michigan Strawberries

The June 2010 Daring Bakers’ challenge was hosted by Dawn of Doable and Delicious. Dawn challenged the Daring Bakers’ to make Chocolate Pavlovas and Chocolate Mascarpone Mousse. The challenge recipe is based on a recipe from the book Chocolate Epiphany by Francois Payard

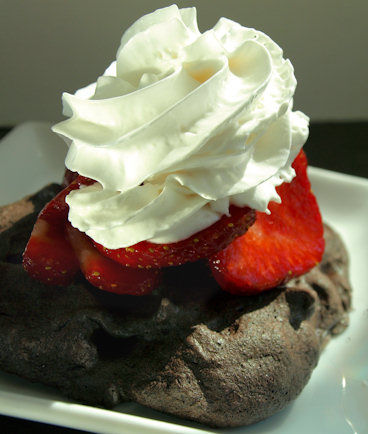
I dub these the pavlovas not meant to be.  One batch I over baked into rock hard pucks.  One batch I over mixed into flattened, rubbery pancakes.  And my final attempt today was the above lumpy, sad blobs.  With my final batch I did obtain the chewy/crispy contrast of a true pavlova with good chocolate flavor which went well with the fresh Michigan strawberries.  But without being artfully piped they resemble the dog bombs in the yard more than something delicious.  Oh well...I do enjoy whipping and playing with eggs and want to thank Dawn Nyman from Doable and Delicious for this month's challenge. 

Links:
-See the complete chocolate pavlova recipe at Dawn's site, Doable and Delicious.
-My other foray into pavlova making, Michigan berry sorbets in mini pavlovas.
-The whipped topping on the pavlova is Soyatoo.
-Visit the Daring Kitchen and see other pavlovas made this month by browsing the Daring Baker Blogroll.

And now for some new Penny pictures!!

The doll baby shot
She was so happy after getting her hand stuck in her sleeve and having a new texture to chew on.

March 27, 2010

DB Tangerine Tian

The 2010 March Daring Baker’s challenge was hosted by Jennifer of Chocolate Shavings. She chose Orange Tian as the challenge for this month, a dessert based on a recipe from Alain Ducasse’s Cooking School in Paris.

Well it's a very good thing I had this post set up ahead of time because the newest edition to our family decided to arrive ahead of schedule yesterday. Presenting Penelope Rose....
Labor went very quickly but felt a hell of a lot more painful than with my son Alex--I guess there has to be a trade off. Penny was born yesterday afternoon at 5:06pm in our home (in a birthing tub) and weighed 8lbs 8oz. The Dog Hill dogs are very interested in her, especially Fritz our puppy who is being very good but very inquisitive. The cats couldn't care less. Alex is being a wonderful big brother and was very brave yesterday during the birth, he even got to cut the cord. He'd just love it if she were awake more so he could show her all of his Bakugan.

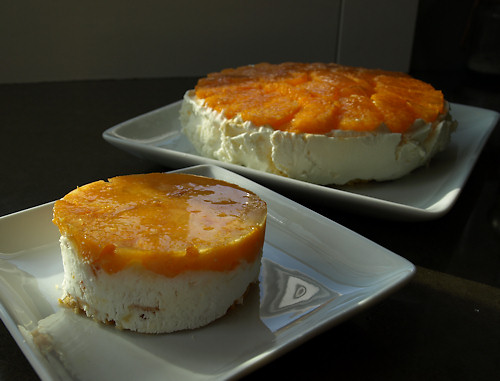
Oh yeah and the tian...not bad as far as my now foggy memory can recall. I liked making the marmalade because I could have eaten the whole batch straight up but I felt the directions overall needed to be better. Alex wasn't a huge fan of the final dish but loved this pate sable recipe made dairy-free. He gobbled up all the extras. His dairy-free tian is the small one in front and the larger one was made using real cow's milk ingredients. With the layers of citrus it was a nice dish for spring.

Links:
-This month's host is Jennifer from www.chocolateshavings.ca
-Recipe Source: Recipe slightly adapted from Alain Ducasse‘s Cooking School in Paris, France (http://www.ecolecuisine-alainducasse.com/).
-Stabilized whipped cream (http://tamsin-cakes.com/2009/06/05/tamsincakes-on-flickr-adventures-in-s...)
-For my dairy-free version I used Soyatoo a dairy-free, soy whipped topping
-The whipped cream layer was made with with local Shetler Dairy heavy cream
-Visit the Daring Kitchen and see all the other tian made this month by browsing the Daring Baker Blogroll.

January 27, 2010

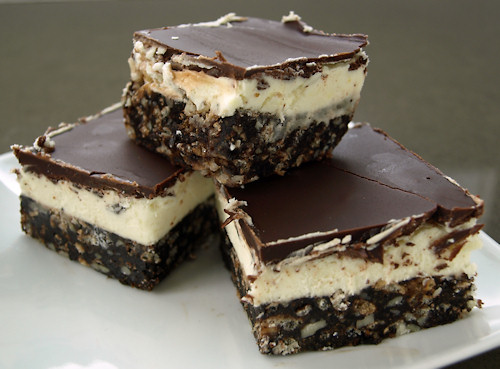
DB Nanaimo Bars


The January 2010 Daring Bakers’ challenge was hosted by Lauren of Celiac Teen. Lauren chose Gluten-Free Graham Wafers and Nanaimo Bars as the challenge for the month. The sources she based her recipe on are 101 Cookbooks and www.nanaimo.ca

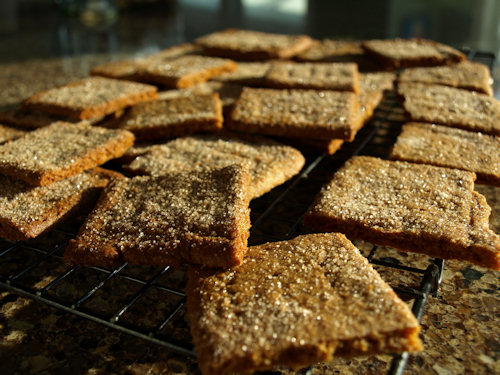
Nanaimos, what can I say? Chocolate, frosting, nuts and graham cracker crust...they are certainly aren't bad but I think the Canadian sweet tooth is just a little too over the top for me. These are sw-EEEE-eet! And even with all the chocolate they can't stand against the greater (in my opinion) Canadian treat, butter tarts. However, I loved that this month's challenge pushed me to finally make a batch of homemade graham crackers. They were insanely good and my husband and I fought over the extras.

For the challenge, I decided to go egg-free and dairy-free but not get the gluten-free flours. I made my typical dairy-free subsitutions: Earth Balance margarine for butter, soy milk for cow's milk, and dairy-free chocolate. Then I replaced the vanilla custard powder with cornstarch plus a little turmeric for color and vanilla extract for flavor. For the egg I mixed up a flax seed egg: 1 tablespoon flax seed meal + 2 tablespoons warm water. I was really hoping these would be a hit with my son and so I also swapped out the coconut flakes (something he won't get near) for rice cereal. Alas, he still chose to drive me crazy by eating only the chocolate and frosting! I should have known.

Links:
-Visit Lauren at Celiac Teen for the complete recipes.
-The original (w/gluten) recipe for graham crackers can be found at 101 Cookbooks. Try them, they are FANTASTIC. The flavor of the honey comes through so beautifully! Besides my dairy-free adaptations, I also substituted half of the all-purpose flour with whole wheat pastry flour.
-The honey I used was Sleeping Bear Farms star thistle honey.
-Lauren also gave us this recipe and video for Vegan Nanaimo Bars from Everyday Dish TV. I used it for inspiration to make my adaptations.
-Visit the Daring Kitchen! There you can also check out all the other super-sweet, Canadian goodies made this month by browsing the Daring Baker Blogroll.

The irresistible graham crackersA double dose of my 9 Bean Rows farm share, I've been a lazy blogger.
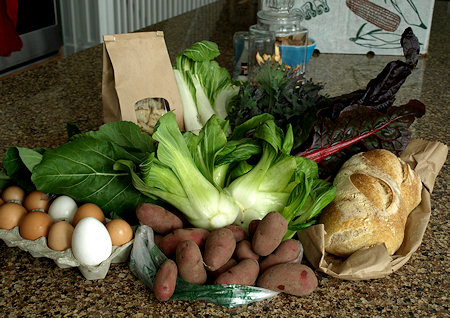
Winter share week #3 (clockwise from top middle)
bok choy, red kale, Swiss chard, bread, red potatoes, more bok choy/pak choi, eggs, collards and croutons
Winter share week #4 (clockwise from top middle)
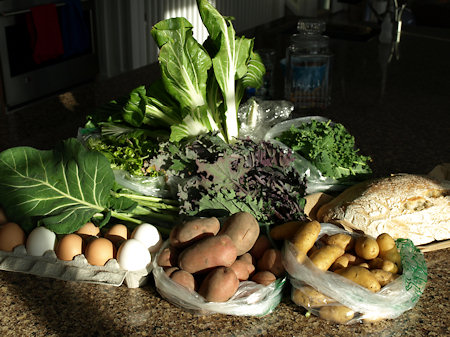

bok choy, kale, bread, yellow fingerling potatoes, red kale, red potatoes, eggs, collards, and salad mix

December 27, 2009

DB Gingerbread House

The December 2009 Daring Bakers’ challenge was brought to you by Anna of Very Small Anna and Y of Lemonpi. They chose to challenge Daring Bakers’ everywhere to bake and assemble a gingerbread house from scratch. They chose recipes from Good Housekeeping and from The Great Scandinavian Baking Book as the challenge recipes.

I love making a yearly gingerbread house. As it was the designated Daring Baker challenge I made changes to my typical gingerbread MO. I tried the recipe that came from Y of Lemonpi because it was less like the recipes I've tried in the past. I liked how sturdy the gingerbread was but found it got very brittle on the second day. This made for some breakage when I was assembling but I did my best to repair and move on. Instead of the little cottage design I normally make, I attempted to copy a house from a photo I found online that had a more complicated roof. I managed it but just barely. I think I need more than once a year practice to improve my technique. I glued the house together with sugar syrup and used the same syrup to form windows. Royal icing, some candy and I was done. I also made a couple of little dog houses and had my son Alex decorate them. This was a great challenge and I can't wait to get time to take a look at all the other Daring Baker houses.

Links:
-I used the recipe given by Y of Lemonpi which came from The Great Scandinavian Baking Book by Beatrice A. Ojakangas. Another option is the Spicy Gingerbread Dough recipe chosen by Anna of Very Small Anna. This recipe is available on Anna's blog as well as Good Housekeeping.com.
-To glue the house together and make the windows I followed the directions for Martha Stewart's caramel syrup
-My house pattern was based (loosely) on this Victorian cottage photo from Flickr
-I purchase CK royal icing mix from Candyland Crafts. I need a kid safe icing and in the past have found that powdered egg whites either taste metallic or have a off color. This icing mix solves both problems and works perfectly for me every time.
-Challenge yourself in the new year by becoming a Daring Baker, now no blog needed! Visit the Daring Kitchen for more information. There you can also check out all the other gingerbread goodness made this month by browsing the Daring Baker Blogroll.
-Go here to see my gingerbread house from last year

2009's gingerbread house
Alex's gingerbread dog house, he insisted on colored frosting

My cardboard gingerbread house patterns

November 27, 2009

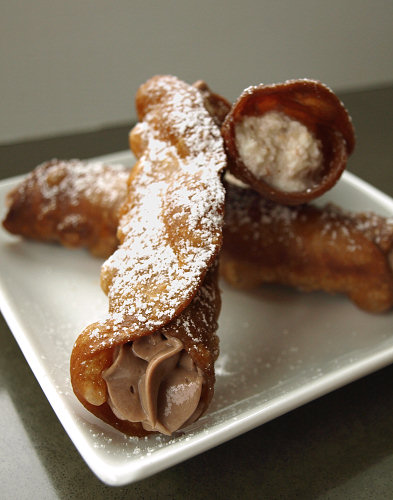
DB Cannoli, done dairy-free

The November 2009 Daring Bakers Challenge was chosen and hosted by Lisa Michele of Parsley, Sage, Desserts and Line Drives. She chose the Italian Pastry, Cannolo (Cannoli is plural), using the cookbooks Lidia’s Italian-American Kitchen by Lidia Matticchio Bastianich and The Sopranos Family Cookbook by Allen Rucker; recipes by Michelle Scicolone, as ingredient/direction guides. She added her own modifications/changes, so the recipe is not 100% verbatim from either book.

Cannoli. My prior experiences with this pastry were that the taste never lived up to the pretty image they presented. However, a chance to try making something new is always welcome and so I dove in hoping for the best. The shells themselves didn't have any dairy ingredients and I made just as the recipe stated. They were time consuming to roll and fry, since I could only roll up four at a time and only fry one or two at a time but it all went relatively well. Can fried dough ever *really* disappoint? The filling is where I dropped the ball.

I decided to try two experiments. Number one, make a typical tofu pudding with silken tofu and melted chocolate. I've been making this pudding since my college days and made with dark chocolate it's always fairly decent. But since my dairy-allergic son isn't a fan of dark chocolate he hasn't liked the tofu pudding I've made in the past. So, I tried making a "Milkless" milk chocolate pudding...big mistake. I used up the last of his leftover Halloween chocolate skulls, which I had ordered from Premium Chocolatiers. They were a lot of fun to watch melt! Along with the melted chocolate, I added a smidge of soy milk, a pinch of salt and splash of vanilla to blend together with a block of silken tofu. Warm it tasted ok but it was too runny to pipe into the cannoli and after it chilled it looked nice enough but had a very harsh soy taste. The pudding did look pretty piped into the cannoli though.

My second experiment was tastier but visually and texturally even a bigger failure. I decided to try and make an almond creme using soaked almonds. I took a chance and left the skins on the almonds knowing that they would make the texture a little rough, but I thought more texture might be good. Then I added a little coconut oil along with powdered sugar and almond extract to make what I hoped would be a ricotta-like, creamy filling. The coconut oil added smoothness to the warm blended mixture. Again my experimenting fell apart when I chilled the creme so that it would be better suited to fill the cannolis. The coconut oil separated out and left tiny fat blobs floating in pureed nuts and liquid. Ah well, it did still taste good.

I've never had a bought cannoli that I loved and although I hoped differently I had a suspicion that it would end up this way. Maybe they just aren't the dessert for me. Thanks to Lisa for the experience, it's always fun to deep fry things!

Links:
-The full recipe for cannoli (including what is surely a much tastier filling than mine made with ricotta cheese) can be found HERE at Lisa's blog Parsley, Sage Desserts and Lineups.
-For the recipes Lisa adapted to create the challenge check out these two cookbooks: Lidia's Italian-American Kitchen by Lidia Matticchio Bastianich and The Sopranos Family Cookbook: As Compiled by Artie Bucco by Allen Rucker and Michele Scicolone
-Are you curious about how to become a Daring Baker yourself? Visit the Daring Kitchen! There you can also check out all the other cannoli made this month by browsing the Daring Baker Blogroll.

"Milkless" chocolate skulls from Premium Chocolatiers
Die you evil chocolate spawn of Satan!
My finished cannoli, tofu pudding filled (bottom) and almond creme filled (top)